SOCIAL MEDIA
Stay Connected with Sherlock.
STAY UPDATED ON SHERLOCK
Enter your email below for updates
on our latest products and sales.


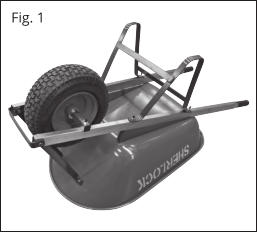
1.
Fig. 1. T
urn the wheelbarro
w over to access the wheel.
Remove bolts holding the axle and remove the wheel from the
axle.
Lay the tyre on a sturd
y work surface with the valve
pointed skywards.
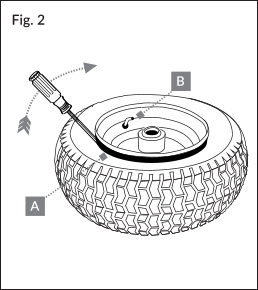
2.
Fig. 2A. Use a tyre lever or a large flat screwdriver to carefully
break the bead between tyre and rim.
Then flip the ridge of the
tyre over the rims edge all the way around the rim.
3.
No
w the
T
yre is only partially fitted to the rim,
push the valve
head back into the rim (Fig. 2B) and remove the old tube.
(Inspect the old tube,
tyre and inner rim for sharp edges or
points tha
t may interfere with the new tube).
4.
Lay the new tube over the wheel and ensure the valve is
positioned the same way with the valve head pointed outwards.
Insert the tube into the tyre and over the rim aligning the valve
stem carefully through the hole in the rim (you may need to
remove the valve mechanism from the valve stem if an
y air
exists in the tube).
5.
Check tha
t the tube is not twisted then refit the tyre to the
rim by levering it back over the ridge of the Steel Rim.
Be careful
not to pinch or dama
ge the tube with levers.
Hint:
Some soa
py
wa
ter or a little silicone grease a
pplied to the rims edge and
tyres edge can help.
6.
F
it the wheel back on the axle and wheelbarro
w then begin
to fill with a air, eg up to 10psi.
Spin the wheel and ta
p with a
rubber mallet to help allevia
te bunching / twists or tensions
between the tube,
tyre and rim.
Then fill it up to a maximum of
20psi (1.3 bar
,
137kpa) until the tyre bead expands a
gainst the
rim.


- HOME
- ABOUT SHERLOCK
- PRODUCTS
- SPARE PARTS
- HELP CENTRE
- CONTACT US
- STORE LOCATOR
- Home
- About
- Terms
- Enter
- Whats-new
- Slimline
- General
- Wheel
- Tube
- Products
- Home-use
- Garden-carts
- Warranty
- Medium-duty
- Trade-tough
- How-to-choose
- Video-guides
- Wheels-tyres-tubes
- Trolley-parts
- Trays-handles-axles-bearings
- Spares
- Help
- Contact


SOCIAL MEDIA
Stay Connected with SHERLOCK.
STAY UPDATED ON SHERLOCK
Enter your email below for updates
on our latest products and sales.


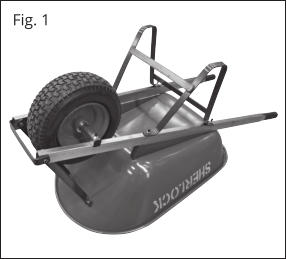
1.
Fig. 1. T
urn the wheelbarro
w over to access
the wheel.
Remove bolts holding the axle
and remove the wheel from the axle.
Lay
the tyre on a sturd
y work surface with the
valve pointed skywards.
2.
Fig. 2A. Use a tyre lever or a large flat
screwdriver to carefully break the bead
between tyre and rim.
Then flip the ridge of
the tyre over the rims edge all the way
around the rim.
3.
No
w the
T
yre is only partially fitted to the
rim,
push the valve head back into the rim
(Fig. 2B) and remove the old tube.
(Inspect
the old tube,
tyre and inner rim for sharp
edges or points tha
t may interfere with the
new tube).
4.
Lay the new tube over the wheel and
ensure the valve is positioned the same
way with the valve head pointed outwards.
Insert the tube into the tyre and over the
rim aligning the valve stem carefully
through the hole in the rim (you may need
to remove the valve mechanism from the
valve stem if an
y air exists in the tube).
5.
Check tha
t the tube is not twisted then refit
the tyre to the rim by levering it back over
the ridge of the Steel Rim.
Be careful not to
pinch or dama
ge the tube with levers.
Hint:
Some soa
py wa
ter or a little silicone grease
a
pplied to the rims edge and tyres edge can
help.
6.
F
it the wheel back on the axle and
wheelbarro
w then begin to fill with a air, eg
up to 10psi.
Spin the wheel and ta
p with a
rubber mallet to help allevia
te bunching /
twists or tensions between the tube,
tyre
and rim.
Then fill it up to a maximum of
20psi (1.3 bar
,
137kpa) until the tyre bead
expands a
gainst the rim.